

Connect Raspberry Pi to Laptop
>> Monday, October 5, 2015

സംസ്ഥാനത്തെ എല്ലാ ഹൈസ്കൂളുകളിലേയും ഈരണ്ട് വീതം എട്ടാംക്ലാസുകാര്ക്ക്, ഇതിനോടകം Raspberry Pi എന്ന കമ്പ്യൂട്ടര് സമ്മാനമായി കിട്ടിക്കാണുമല്ലോ? എന്താണീ കുഞ്ഞന് കമ്പ്യൂട്ടറെന്ന് ഇവിടെ നേരത്തേ പ്രസിദ്ധീകരിച്ചിട്ടുണ്ട്. രണ്ടുഘട്ടങ്ങളിലായി അഞ്ചുദിവസം ഇതിന്റെ പരിശീലനമുണ്ടാകുമെന്നാണ് അറിയുന്നത്.സിസ്റ്റവും കീബോര്ഡും മൗസുമൊക്കെയുണ്ടെങ്കിലും, ടിവിയുമായോ ഏതെങ്കിലും മോണിറ്ററുമായോ ഘടിപ്പിച്ചുവേണം ഇത് ഉപയോഗിക്കാന്! ലാപ്ടോപ്പുമായി ഇത് കണക്ട് ചെയ്യാമോ എന്ന ചോദ്യം ഉയര്ന്നുകേള്ക്കുന്നുണ്ട്. ഈ രംഗത്ത് വിദഗ്ദനായ,എറണാകുളത്തെ ഐടി@സ്കൂള് മാസ്റ്റര് ട്രൈനര് ദേവരാജന് സാര്ഈ പോസ്റ്റിലൂടെ ഉത്തരം തരുന്നുണ്ട്. സംശയങ്ങള് കമന്റ് ചെയ്താല്, സഹായിക്കാമെന്നും അദ്ദേഹം ഏറ്റിട്ടുണ്ട്...
1. Micro SD Card നെ SD card Adapter ഉപയോഗിച്ച് ലാപ്ടോപ്പുമായി ബന്ധിപ്പിക്കുക. Applications – System Tools – Preferences എന്ന ക്രമത്തില് Disks തുറക്കുക. Micro SD Card ല് നിലവിലുള്ള പാര്ട്ടീഷനുകളെല്ലാം ഒഴിവാക്കി ഒറ്റ പാര്ട്ടീഷനാക്കി ഫോര്മാറ്റ് ചെയ്യുക. Disks ഇനി close ചെയ്യാം.

2. 2015-05-05-raspbian-wheezy.zip എന്ന ഫയല് ഡൗണ്ലോഡ് ചെയ്ത് ഒരു ഫോള്ഡറില് സൂക്ഷിക്കുക. ഈ ഫോള്ഡര് ടെര്മിനലില് തുറന്ന് sha1sum 2015-05-05-raspbian-wheezy.zip എന്ന കമാന്ഡ് കൊടുക്കുക.

ചിത്രത്തില് കൊടുത്തിരിക്കുന്നതുപോലെയുള്ള String വരികയാണെങ്കില് നാം ഡൗണ്ലോഡ് ചെയ്ത OS ശരിയാണെന്ന് മനസ്സിലാക്കാം.
3. നാം ഡൗണ്ലോഡ് ചെയ്ത OS, unzip ചെയ്യുക എന്നതാണ് അടുത്ത പടി. അതിനായി unzip 2015-05-05-raspbian-wheezy.zip എന്ന കമാന്ഡ് കൊടുക്കുക. ഈ കമാന്ഡിന്റെ പ്രവര്ത്തനം പൂര്ത്തിയായി കഴിഞ്ഞാല് 2015-05-05-raspbian-wheezy.img എന്ന പേരിലുള്ള പുതിയ ഫയല് ഫോള്ഡറില് തയ്യാറായിട്ടുണ്ടാകും. എളുപ്പത്തിനായി ഈ ഫയലിനെ 1.img എന്ന് rename ചെയ്ത് വയ്ക്കാം.

4. റാസ്പ്ബെറി പൈയില് ഉപയോഗിക്കേണ്ട micro SD കാര്ഡിനെ കമാന്ഡ് മോഡില് തിരിച്ചറിയുക എന്നതാണ് അടുത്തത്. ഇതിനായി sudo fdisk -l എന്ന കമാന്ഡ് കൊടുക്കുക. ചിത്രത്തില് കൊടുത്തിരിക്കുന്നതുപോലെ mmcblk0 എന്നോ sdb എന്നോ micro SD കാര്ഡ് തിരിച്ചറിയപ്പെടും.

5. 2015-05-05-raspbian-wheezy.img എന്ന ഫയലിനെ micro SD കാര്ഡിലേക്ക് കോപ്പി ചെയ്യുക എന്നതാണ് അടുത്തത്. അതിനായി sudo dd bs=1M if=1.img of=/dev/mmcblk0 എന്ന കമാന്ഡ് കൊടുക്കുക. കുറച്ചു സമയത്തിനുള്ളില് OS micro SD കാര്ഡിലേക്ക് കോപ്പി ആകും.

6. sudo sync എന്ന കമാന്ഡ് കൊടുത്ത് ഈ പ്രവര്ത്തനം പൂര്ണ്ണമാക്കാം. micro SD card ഇനി റാസ്പ്ബെറി പൈയില് insert ചെയ്യാം.
7. ലാപ്ടോപ്പും റാസ്പ്ബെറി പൈയും ഒരു നെറ്റ്വര്ക്ക് കേബിള് ഉപയോഗിച്ച് ബന്ധിപ്പിക്കുക. നെറ്റ്വര്ക്ക് കണക്ഷന് ലാപ്ടോപ്പിനേയും റാസ്പ്ബെറി പൈയെയും തിരിച്ചറിയുന്നതിനായി ലാപ്ടോപ്പിലെ നെറ്റ്വര്ക്ക് ആപ്പ്ലെറ്റില് നിന്നും Edit Connections എടുത്ത് Ethernet കണക്ഷനെ RaspiBridge എന്ന് നാമകരണം ചെയ്ത്, IPv4Settings ല് Method – Shared to Other Computers ഉം, IPv6Settings ല് Method – Ignore ഉം കൊടുക്കുക. ഇപ്പോള് റാസ്പ്ബെറി പൈയും ലാപ്ടോപ്പുമായി നെറ്റ്വര്ക്ക് കണക്ഷന് ആയിക്കഴിഞ്ഞു.

8. ലാപ്ടോപ്പിന്റെ IP Address മനസ്സിലാക്കുന്നതിന് ലാപ്ടോപ്പിലെ നെറ്റ്വര്ക്ക് ആപ്പ്ലെറ്റില് നിന്നും Connection Information എടുത്താല് മതി.

9. നെറ്റ്വര്ക്ക് ലാപ്ടോപ്പിന് IP Address കൊടുത്തിരിക്കുന്നതുപോലെ റാസ്പ്ബെറി പൈക്കും ഒരു IP Address കൊടുത്തിട്ടുണ്ടായിരിക്കും. ഇത് മനസ്സിലാക്കുന്നതിന് nmap എന്ന സോഫ്റ്റ്വെയര് ഇന്സ്റ്റാള് ചെയ്യണം. ഇവിടെ നിന്നും ഡൗണ്ലോഡ് ചെയ്യാം.
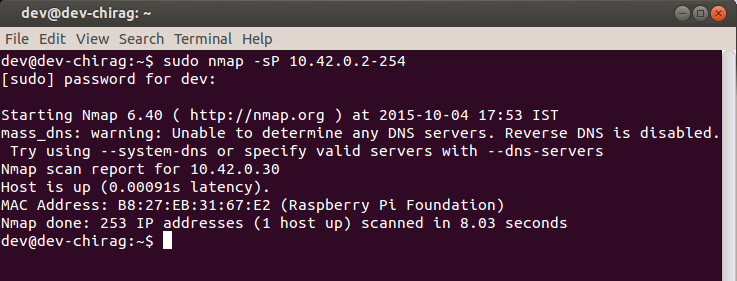
10. nmap എന്ന സോഫ്റ്റ്വെയര് ഇന്സ്റ്റാള് ചെയ്തു കഴിഞ്ഞാല് sudo nmap -sP 10.42.0.2-254 എന്ന കമാന്ഡ് കൊടുത്ത് ഏതെല്ലാം കമ്പ്യൂട്ടറുകളാണ് ഈ നെറ്റ്വര്ക്കില് ബന്ധിപ്പിച്ചിരിക്കുന്നത് എന്ന് മനസ്സിലാക്കാം. ഇവിടെ 10.42.0.30 എന്ന IP Address ആണ് റാസ്പ്ബെറി പൈയ്ക്ക് കിട്ടിയിരിക്കുന്നത്.

11. റാസ്പ്ബെറി പൈയ്ക്ക് കൊടുത്തിരിക്കുന്ന IP Address മനസ്സിലാക്കിയതിനു ശേഷം പൈയെ ലാപ്ടോപ്പുമായി കമാന്ഡ് മോഡില് കണക്ട് ചെയ്യാം. ഇതിനായി ssh 10.42.0.30 -l pi എന്ന കമാന്ഡ് കൊടുക്കുക. പൈയുടെ പാസ്സ്വേഡ് ആവശ്യപ്പെടുമ്പോള് raspberry കൊടുക്കുക.

12. പുതിയതായി raspbian OS റാസ്പ്ബെറിയില് install ചെയ്തതാണെങ്കില് OS Configure ചെയ്യണം. അതിനായി sudo raspi-configure എന്ന കമാന്ഡ് കൊടുക്കുക. തുറന്നു വരുന്ന ജാലകത്തില് നിന്നും 1. Expand Filesystem സെലക്ട് ചെയ്ത് Select ല് Tab key ഉപയോഗിച്ച് cursor എത്തിച്ച് Enter key അമര്ത്തുക. റാസ്പ്ബെറി പൈയില് OS install ആയിക്കഴിഞ്ഞു.


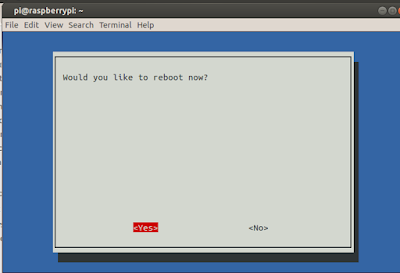

റാസ്പ്ബെറി പൈ Reboot ആയിക്കഴിഞ്ഞാല് ലാപ്ടോപ്പിലെ network connectivity വീണ്ടും Connected എന്ന message തരുന്നതു കാണാം. വീണ്ടും Terminal ല് sudo nmap -sP 10.42.0.2-254 എന്ന കമാന്ഡ് കൊടുത്ത് പൈയുടെ IP Address കണ്ടുപിടിക്കാം. അതിനുശേഷം കമാന്ഡ് മോഡില് തന്നെ പൈയെ ലാപ്ടോപ്പുമായി connect ചെയ്യാം.
13. ലാപ്ടോപ്പിലെ വയര്ലെസ്സ് ഇന്റര്നെറ്റ് കണക്ടിവിറ്റി ഇനി പൈയിലും ലഭിക്കും. പൈയുടെ ഡസ്ക്ടോപ്പ് കാണുന്നതിനായി tightvncserver എന്ന സോഫ്റ്റ്വെയര് ഇതില് install ചെയ്യണം. sudo apt-get install tightvncserver എന്ന കമാന്ഡ് നല്കി ഈ സോഫ്റ്റ്വെയര് ഓണ്ലൈനായി ഇന്സ്റ്റാള് ചെയ്യാം.

14. tightvncserver ഇന്സ്റ്റാള് ചെയ്തശേഷം ഈ സോഫ്റ്റ്വെയര് പൈയില് configure ചെയ്യണം. tightvncserver എന്ന കമാന്ഡ് നല്കിയാല് ഇതിനുവേണ്ടി ഉപയോഗിക്കേണ്ട 8 അക്ഷര പാസ്സ്വേഡ് ചോദിക്കും. ഇത് കുറിച്ചുവെക്കണം.
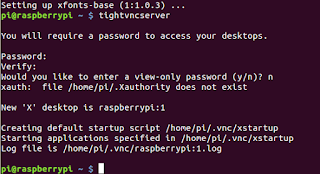
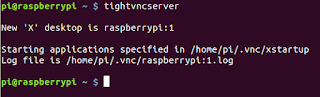
15. tightvncserver എന്ന കമാന്ഡ് നല്കി tightvncserver പ്രവര്ത്തിപ്പിക്കാം.
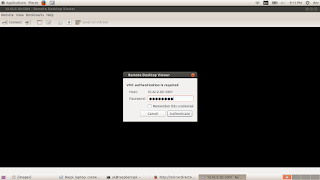
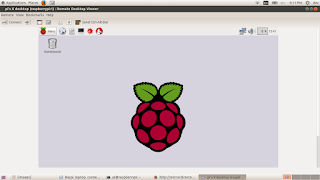
16. ലാപ്ടോപ്പില് പൈയുടെ GUI കാണുന്നതിനായി നമ്മെ സഹായിക്കുന്ന സോഫ്റ്റ്വെയറാണ് Remote Desktop Viewer. Applications – Internet – Remote Desktop Viewer എന്ന രീതിയില് തുറക്കുക.
16. Remote Desktop Viewer ല് Connect എന്ന ബട്ടണ് ക്ലിക്ക് ചെയ്തശേഷം വരുന്ന Connect Dialogue Box ല് Protocol VNC സെലക്ട് ചെയ്യുക. Host ല് പൈയുടെ IP Address ഉം :1 ഉം (ഉദാ - 10.42.0.30:1) ടൈപ്പ് ചെയ്ത് Connect ല് ക്ലിക്ക് ചെയ്ത് പൈയുടെ vnc authentication password നല്കിയാല് പൈയുടെ Desktop ദൃശ്യമാകും.
ലാപ്ടോപ്പിന്റെ കീബോര്ഡും മൗസും ഉപയോഗിച്ച് പൈത്തണ് പ്രോഗ്രാമുകള് തയ്യാറാക്കുകയോ Scratch ല് ഗെയിമുകള് തയ്യാറാക്കുകയോ ഒക്കെ ആവാം.
1. Micro SD Card നെ SD card Adapter ഉപയോഗിച്ച് ലാപ്ടോപ്പുമായി ബന്ധിപ്പിക്കുക. Applications – System Tools – Preferences എന്ന ക്രമത്തില് Disks തുറക്കുക. Micro SD Card ല് നിലവിലുള്ള പാര്ട്ടീഷനുകളെല്ലാം ഒഴിവാക്കി ഒറ്റ പാര്ട്ടീഷനാക്കി ഫോര്മാറ്റ് ചെയ്യുക. Disks ഇനി close ചെയ്യാം.

2. 2015-05-05-raspbian-wheezy.zip എന്ന ഫയല് ഡൗണ്ലോഡ് ചെയ്ത് ഒരു ഫോള്ഡറില് സൂക്ഷിക്കുക. ഈ ഫോള്ഡര് ടെര്മിനലില് തുറന്ന് sha1sum 2015-05-05-raspbian-wheezy.zip എന്ന കമാന്ഡ് കൊടുക്കുക.

ചിത്രത്തില് കൊടുത്തിരിക്കുന്നതുപോലെയുള്ള String വരികയാണെങ്കില് നാം ഡൗണ്ലോഡ് ചെയ്ത OS ശരിയാണെന്ന് മനസ്സിലാക്കാം.
3. നാം ഡൗണ്ലോഡ് ചെയ്ത OS, unzip ചെയ്യുക എന്നതാണ് അടുത്ത പടി. അതിനായി unzip 2015-05-05-raspbian-wheezy.zip എന്ന കമാന്ഡ് കൊടുക്കുക. ഈ കമാന്ഡിന്റെ പ്രവര്ത്തനം പൂര്ത്തിയായി കഴിഞ്ഞാല് 2015-05-05-raspbian-wheezy.img എന്ന പേരിലുള്ള പുതിയ ഫയല് ഫോള്ഡറില് തയ്യാറായിട്ടുണ്ടാകും. എളുപ്പത്തിനായി ഈ ഫയലിനെ 1.img എന്ന് rename ചെയ്ത് വയ്ക്കാം.

4. റാസ്പ്ബെറി പൈയില് ഉപയോഗിക്കേണ്ട micro SD കാര്ഡിനെ കമാന്ഡ് മോഡില് തിരിച്ചറിയുക എന്നതാണ് അടുത്തത്. ഇതിനായി sudo fdisk -l എന്ന കമാന്ഡ് കൊടുക്കുക. ചിത്രത്തില് കൊടുത്തിരിക്കുന്നതുപോലെ mmcblk0 എന്നോ sdb എന്നോ micro SD കാര്ഡ് തിരിച്ചറിയപ്പെടും.

5. 2015-05-05-raspbian-wheezy.img എന്ന ഫയലിനെ micro SD കാര്ഡിലേക്ക് കോപ്പി ചെയ്യുക എന്നതാണ് അടുത്തത്. അതിനായി sudo dd bs=1M if=1.img of=/dev/mmcblk0 എന്ന കമാന്ഡ് കൊടുക്കുക. കുറച്ചു സമയത്തിനുള്ളില് OS micro SD കാര്ഡിലേക്ക് കോപ്പി ആകും.

6. sudo sync എന്ന കമാന്ഡ് കൊടുത്ത് ഈ പ്രവര്ത്തനം പൂര്ണ്ണമാക്കാം. micro SD card ഇനി റാസ്പ്ബെറി പൈയില് insert ചെയ്യാം.
7. ലാപ്ടോപ്പും റാസ്പ്ബെറി പൈയും ഒരു നെറ്റ്വര്ക്ക് കേബിള് ഉപയോഗിച്ച് ബന്ധിപ്പിക്കുക. നെറ്റ്വര്ക്ക് കണക്ഷന് ലാപ്ടോപ്പിനേയും റാസ്പ്ബെറി പൈയെയും തിരിച്ചറിയുന്നതിനായി ലാപ്ടോപ്പിലെ നെറ്റ്വര്ക്ക് ആപ്പ്ലെറ്റില് നിന്നും Edit Connections എടുത്ത് Ethernet കണക്ഷനെ RaspiBridge എന്ന് നാമകരണം ചെയ്ത്, IPv4Settings ല് Method – Shared to Other Computers ഉം, IPv6Settings ല് Method – Ignore ഉം കൊടുക്കുക. ഇപ്പോള് റാസ്പ്ബെറി പൈയും ലാപ്ടോപ്പുമായി നെറ്റ്വര്ക്ക് കണക്ഷന് ആയിക്കഴിഞ്ഞു.

8. ലാപ്ടോപ്പിന്റെ IP Address മനസ്സിലാക്കുന്നതിന് ലാപ്ടോപ്പിലെ നെറ്റ്വര്ക്ക് ആപ്പ്ലെറ്റില് നിന്നും Connection Information എടുത്താല് മതി.

9. നെറ്റ്വര്ക്ക് ലാപ്ടോപ്പിന് IP Address കൊടുത്തിരിക്കുന്നതുപോലെ റാസ്പ്ബെറി പൈക്കും ഒരു IP Address കൊടുത്തിട്ടുണ്ടായിരിക്കും. ഇത് മനസ്സിലാക്കുന്നതിന് nmap എന്ന സോഫ്റ്റ്വെയര് ഇന്സ്റ്റാള് ചെയ്യണം. ഇവിടെ നിന്നും ഡൗണ്ലോഡ് ചെയ്യാം.
10. nmap എന്ന സോഫ്റ്റ്വെയര് ഇന്സ്റ്റാള് ചെയ്തു കഴിഞ്ഞാല് sudo nmap -sP 10.42.0.2-254 എന്ന കമാന്ഡ് കൊടുത്ത് ഏതെല്ലാം കമ്പ്യൂട്ടറുകളാണ് ഈ നെറ്റ്വര്ക്കില് ബന്ധിപ്പിച്ചിരിക്കുന്നത് എന്ന് മനസ്സിലാക്കാം. ഇവിടെ 10.42.0.30 എന്ന IP Address ആണ് റാസ്പ്ബെറി പൈയ്ക്ക് കിട്ടിയിരിക്കുന്നത്.
11. റാസ്പ്ബെറി പൈയ്ക്ക് കൊടുത്തിരിക്കുന്ന IP Address മനസ്സിലാക്കിയതിനു ശേഷം പൈയെ ലാപ്ടോപ്പുമായി കമാന്ഡ് മോഡില് കണക്ട് ചെയ്യാം. ഇതിനായി ssh 10.42.0.30 -l pi എന്ന കമാന്ഡ് കൊടുക്കുക. പൈയുടെ പാസ്സ്വേഡ് ആവശ്യപ്പെടുമ്പോള് raspberry കൊടുക്കുക.

12. പുതിയതായി raspbian OS റാസ്പ്ബെറിയില് install ചെയ്തതാണെങ്കില് OS Configure ചെയ്യണം. അതിനായി sudo raspi-configure എന്ന കമാന്ഡ് കൊടുക്കുക. തുറന്നു വരുന്ന ജാലകത്തില് നിന്നും 1. Expand Filesystem സെലക്ട് ചെയ്ത് Select ല് Tab key ഉപയോഗിച്ച് cursor എത്തിച്ച് Enter key അമര്ത്തുക. റാസ്പ്ബെറി പൈയില് OS install ആയിക്കഴിഞ്ഞു.


റാസ്പ്ബെറി പൈ Reboot ആയിക്കഴിഞ്ഞാല് ലാപ്ടോപ്പിലെ network connectivity വീണ്ടും Connected എന്ന message തരുന്നതു കാണാം. വീണ്ടും Terminal ല് sudo nmap -sP 10.42.0.2-254 എന്ന കമാന്ഡ് കൊടുത്ത് പൈയുടെ IP Address കണ്ടുപിടിക്കാം. അതിനുശേഷം കമാന്ഡ് മോഡില് തന്നെ പൈയെ ലാപ്ടോപ്പുമായി connect ചെയ്യാം.
13. ലാപ്ടോപ്പിലെ വയര്ലെസ്സ് ഇന്റര്നെറ്റ് കണക്ടിവിറ്റി ഇനി പൈയിലും ലഭിക്കും. പൈയുടെ ഡസ്ക്ടോപ്പ് കാണുന്നതിനായി tightvncserver എന്ന സോഫ്റ്റ്വെയര് ഇതില് install ചെയ്യണം. sudo apt-get install tightvncserver എന്ന കമാന്ഡ് നല്കി ഈ സോഫ്റ്റ്വെയര് ഓണ്ലൈനായി ഇന്സ്റ്റാള് ചെയ്യാം.

14. tightvncserver ഇന്സ്റ്റാള് ചെയ്തശേഷം ഈ സോഫ്റ്റ്വെയര് പൈയില് configure ചെയ്യണം. tightvncserver എന്ന കമാന്ഡ് നല്കിയാല് ഇതിനുവേണ്ടി ഉപയോഗിക്കേണ്ട 8 അക്ഷര പാസ്സ്വേഡ് ചോദിക്കും. ഇത് കുറിച്ചുവെക്കണം.

15. tightvncserver എന്ന കമാന്ഡ് നല്കി tightvncserver പ്രവര്ത്തിപ്പിക്കാം.

16. ലാപ്ടോപ്പില് പൈയുടെ GUI കാണുന്നതിനായി നമ്മെ സഹായിക്കുന്ന സോഫ്റ്റ്വെയറാണ് Remote Desktop Viewer. Applications – Internet – Remote Desktop Viewer എന്ന രീതിയില് തുറക്കുക.
16. Remote Desktop Viewer ല് Connect എന്ന ബട്ടണ് ക്ലിക്ക് ചെയ്തശേഷം വരുന്ന Connect Dialogue Box ല് Protocol VNC സെലക്ട് ചെയ്യുക. Host ല് പൈയുടെ IP Address ഉം :1 ഉം (ഉദാ - 10.42.0.30:1) ടൈപ്പ് ചെയ്ത് Connect ല് ക്ലിക്ക് ചെയ്ത് പൈയുടെ vnc authentication password നല്കിയാല് പൈയുടെ Desktop ദൃശ്യമാകും.

ലാപ്ടോപ്പിന്റെ കീബോര്ഡും മൗസും ഉപയോഗിച്ച് പൈത്തണ് പ്രോഗ്രാമുകള് തയ്യാറാക്കുകയോ Scratch ല് ഗെയിമുകള് തയ്യാറാക്കുകയോ ഒക്കെ ആവാം.


14 comments:
വായിച്ചു. സംഗതി സിംപിള്. ആര്ക്കും പെട്ടെന്നു മനസ്സിലാവും എനിക്കൊഴിച്ച്
എന്റ കാര്യം അല്ലെങ്കിലും അങ്ങനെയാ. ഒരു വക ഇപ്പോള് മനസ്സിലാവുന്നില്ല
കഴിഞ്ഞ ദിവസം ഞാനൊരു പുസ്തകത്തില് ബുധന്റെ മൌഡ്യം കണക്കു കൂട്ടി കണ്ടുപിടിക്കുന്നതെങ്ങനെയെന്നു വായിച്ചു അതിന്റെ കുറച്ചു ഭാഗം ഗണിതാധ്യാപകരുടെ മുമ്പില് വെക്കുന്നു. ഒന്നു സഹായിക്കണം
സൂര്യസ്ഫുടം അല്പവും ഗ്രഹസ്ഫുടം വലുതുമായാല് അസ്തമയത്തിനും അല്ലെങ്കില് സഉദയത്തിനുമാണ് ഗ്രഹമൌഡ്യം ഗണിക്കോണ്ടത്. അപ്പോഴത്തെ ഗ്രഹമധ്യമം ഉണ്ടാക്കി കണ്ടുവെച്ച് മന്ദോച്ചം വാങ്ങി മന്ദകര്ണ്ണവും വാങ്ങി മന്ദജ്യാവിനെ ഗ്രഹമധ്യത്തില്സംസ്ക്കരിച്ചാല്മന്ദസ്ഫുടം വരും. പിന്നെ ഈ മന്ദസ്ഫുടം വച്ച് പാതം വാങ്ങി അതിന്റെ ഭുജത്തിന് ചന്ദ്രപരിണതിജ്യാവും ചന്ദ്രവിക്ഷേപജ്യാവും വരുത്തണം. ചന്ദ്രപരിണതിയെ കുജാതിഗ്രഹങ്ങള്ക്ക് ക്രമത്തില്5-51-13- എന്നീ സംഖ്യകള് കൊണ്ട് ഗുണിച്ച് 7-28-14-77 ഈ സംഖ്കള്കൊണ്ട് ഹരിച്ചാല് ഇതിന്റെ പരിണതിഫലം കിട്ടും
.........................ഇതിന്റെ ഭുജത്തിന്മഹാജ്യാവും കോടിക്ക് ലക്ഷജ്യാവും വരുത്തി ഭുജജ്യാവായ മഹാജ്യാവിനെ കണ്ടെത്തുക. പിന്നീട് ഗ്രഹത്തിന്റെയും സൂര്യന്റെയും മന്ദകര്ണ്ണങ്ങളെ തമ്മില് പെരുക്കി ത്രിജ്യ കൊണ്ട് ഹരിച്ച ഫലത്തെ ഗ്രഹസൂര്യന്മാരുടെ സ്ഫുടമന്ദകര്ണ്ണദ്വയവര്ഗയോഗത്തില്ശീഘ്രകേന്ദ്രം മൃഗാദിയെങ്കില്കൂട്ടുകയും കര്ക്യാദിയെങ്കില്കളയുകയും ചെയ്ത സംഖ്യയെ മൂിച്ചാല്വുന്നഫലം ശീഘ്രകര്ണമാണ്...........
ഇൻസ്റ്റാൾ ചെയ്ത raspbery യിൽ GUI open ചെയ്തുവരാൻ എന്തുചെയ്യണം ?
HOWTO: Use Android Tablet as a screen / keyboard
What this does:
1. Allows you to use your Android device as keyboard input and terminal display for your Raspberry Pi
2. Allows you to tether your Raspberry PI to your Android device's WiFi (3G untested, but should work).
Background:
I love the idea of a truly portable Raspberry Pi box. I wanted to make one, but I don't have a compatible WiFi dongle, nor do I have a wireless keyboard and mouse. Even if I did all of these things, I'd like to save myself the extra USB port by having both my network and input go over the same port. I guess the next thing to do after this would be to set up some sort of VNC server and connect to the Pi's GUI via the Droid.
My Build:
Raspberry Pi v2 (Linux raspberrypi 3.1.9+ #125 PREEMPT)
Asus Transformer Prime (Android 4.1.1. Jelly Bean)
Yoobao "Long March" -11200mA 1A / 2A battery (good for 10+ hours!)
VX ConnectBot terminal emulator (Free in the Google Play store)
Hackers Keyboard - because I like tab complete (Free in the Google Play store)
How it looks (Click URL to embiggen)
Image
http://farm9.staticflickr.com/8032/8042774604_911220b520_b.jpg
Assumptions:
Your PI is configured to run SSHd on startup
You are using the default Pi username / password
Your Android device has internet connectivity via WiFi/3G and it is enabled
How to do it:
1. Add the following to /etc/network/interfaces
iface usb0 inet static
address 192.168.42.42
netmask 255.255.255.0
network 192.168.42.0
broadcast 192.168.42.255
2. Power down your Pi
3. Connect your Android device to your Pi via it's USB data cable
4. Power up your Pi... wait about a minute.
5. On your Android device, go to Settings / Wireless & Networks / More / Tethering & Portable Hotspot... click "USB tethering"
6. Start up VX ConnectBot and SSH "pi@192.168.42.42"
7. Keep hitting return until it asks you for your password. Enter it.
Congratulations - you should now have terminal access to your Pi with a software keyboard... kinda. Mine seems to disconnect the session every minute or so - very annoying.
Now to set up routing so that your Pi can see the world via your Android device.
8. Root yourself up
sudo su -
9. Check to see which IP address that your Android device is using
arp -a
mine is 192.168.42.129
10. Add a default route pointing all traffic from your Pi out to your Android device. It's worth noting that this static route is temporary and will not survive rebooting your Pi. I've left it like this because I don't know if Android likes to change it's tether gateway address very often. If you've gotten this far, I'll assume you can figure out how to make a static route permanent if need be :)
route add default gw 192.168.42.129 usb0
11. Test it!
ping http://www.google.com
Cherish Abraham
@Unknown said...
ഇൻസ്റ്റാൾ ചെയ്ത raspbery യിൽ GUI open ചെയ്തുവരാൻ എന്തുചെയ്യണം ?
answer :
use the command startx at prompt
CHERISH ABRAHAM
സ്ഥിരമായി GUI ൽ ബൂട്ട് ചെയ്യാൻ മാർഗമുണ്ടോ ?
വിജ്ഞാനപ്രദം...
@ ടി എം said...
സ്ഥിരമായി GUI ൽ ബൂട്ട് ചെയ്യാൻ മാർഗമുണ്ടോ ?
Answer:
Open LXTerminal
Type the command
sudo nano /etc/rc.local
Add the line before exit 0:
su -l pi -c startx
save the file and restart.
അല്ലെങ്കില്, പുതിയ OS ഇന്സ്റ്റാള് ചെയ്താല് GUI ല് സ്ഥിരമായി ബൂട്ട് ചെയ്യും.
https://wiki.outernet.is/wiki/ORxPi
ഈ ജനാര്ദ്ദനന് സാറിന്റെ ഒരു കാര്യം..... റാസ്പ്ബറി പൈയുടെ ബൂട്ടിംഗ് സംബന്ധിച്ച കാര്യങ്ങള് അത്രയ്ക്കങ്ങട് സിമ്പിളായില്ലായെന്ന് ഭംഗ്യന്തരേണ സൂചിപ്പിച്ചതു പോലെയെനിക്ക് തോന്നി ...ശരിയാണോയെന്തോ..... ഏതായാലും എട്ടാം ക്ലാസ്സിലെ കുട്ടികള്ക്കാണിത് എന്നകാര്യം സ്പഷ്ടമാണ്. അവരിത് ചെയ്യുമോയെന്തോ.....ഓര്ക്കുമ്പോള് ചിരി വരുന്നൂ...മാറിക്കോ...
Sir
Please Post Download Link For Ubuntu 14.4
How can we connect a Card Machine( swiping machine to Raspberry Pi
I got raspberry pi in Ernakulam town hall I seed you .where your class of raspberry pi programing where and when mail me in this gmail: ajithmnv@gmail.com
ee nirddeshangalute pdf file kittiyal nannayirunnu
Sir, Can you please tell me when will raspberry pi training classes start?
Post a Comment